-Pre-installed with the NEW and IMPROVED M3GPS X6 SE navigation software
-comes with FM Transmitter, Lane assist, Junction Views, realistic 3D buildings and landmarks, Multimedia players, improved routing, guidance and many more
The Model Of WayWay Q5033 GPS Navigator with Junction View & 3D Building
The WayWay Q5033 now is even with more features which comes High definition 800x480 screen resolution and supports Voice Command Activation.
The Q5033 is improved in terms of hardware which comes with SiRF V with 533MHz, High definition 800x480 screen resolution and supports Voice Command Activation that allows user speak out the destination without key in (selected software). It also has multimedia player, photo viewer, e-Book, Games & more!!
WayWay Q5033 Features:
1. SiRF Atlas-V, dual-core, ARM11 CPU, 533MHZ.
2. High Resolution 800 x 480
3. 5.0” TFT LCD screen with sensitive touch panel.
4. Built-in high memory capacity of 128MB.
5. Large internal memory storage of 2GB
6. Additional storage via MicroSD Card slot
7. Multimedia Player Support
8. Games, calculator & conversion tool function
9. Multiple language support
Acronis True Image is disk imaging software, developed by Acronis, that creates backups and recovers PC systems. The software allows a user to create an image of a disk while it is running Microsoft Windows or offline by booting from CD/DVD, USB flash drives, PXE, or other bootable media. As a disk imaging software, True Image can restore the previously captured image to another disk, replicating the structure and contents to the new disk, also allowing disk cloning and partition resizing, as well if the new disk is of different capacity.
I have tested and used the latest version of Acronis True Image Home 2011 on Core 2 duo processor and 4GB RAM, backup of system (partition C) and partition D with total of more than 8GB only take less then 10 minutes. Restoration of the image created take only less than 15 minutes. Remarkable and outstanding performance. Imagine how long would it take to prepared a lab with 40 computer using old method (manual) probably 1 or 2 weeks, but by using Acronis maybe we need only 1 day to finish preparing all 40 computer (40 x 15 minutes = 600 minutes= 10 hours only )
Try it , you surely satisfied.
Google Public DNS is a free, global Domain Name System (DNS) resolution service, that you can use as an alternative to your current DNS provider.
To try it out:
Configure your network settings to use the IP addresses 8.8.8.8 and 8.8.4.4 as your DNS servers or
Read configuration instructions.
If you decide to try Google Public DNS, your client programs will perform all DNS lookups using Google Public DNS.
Why does DNS matter?
The DNS protocol is an important part of the web's infrastructure, serving as the Internet's phone book: every time you visit a website, your computer performs a DNS lookup. Complex pages often require multiple DNS lookups before they start loading, so your computer may be performing hundreds of lookups a day.
Why should you try Google Public DNS?
By using Google Public DNS you can:
Speed up your browsing experience.
Improve your security.
Get the results you expect with absolutely no redirection.
You're probably familiar with the popular proprietary commercial package Norton Ghost®. The problem with these kind of software packages is that it takes a lot of time to massively clone systems to many computers. You've probably also heard of Symantec's solution to this problem, Symantec Ghost Corporate Edition® with multicasting. Well, now there is an OpenSource clone system (OCS) solution called Clonezilla with unicasting and multicasting!
Clonezilla, based on DRBL, Partclone and udpcast, allows you to do bare metal backup and recovery. Two types of Clonezilla are available, Clonezilla live and Clonezilla SE (server edition). Clonezilla live is suitable for single machine backup and restore. While Clonezilla SE is for massive deployment, it can clone many (40 plus!) computers simultaneously. Clonezilla saves and restores only used blocks in the harddisk. This increases the clone efficiency. At the NCHC's Classroom C, Clonezilla SE was used to clone 41 computers simultaneously. It took only about 10 minutes to clone a 5.6 GBytes system image to all 41 computers via multicasting!
Features:
Free (GPL) Software.
Filesystem supported: (1) ext2, ext3, ext4, reiserfs, reiser4, xfs, jfs of GNU/Linux, (2) FAT, NTFS of MS Windows, (3) HFS+ of Mac OS, (4) UFS of FreeBSD, NetBSD, and OpenBSD, and (5) VMFS of VMWare ESX. Therefore you can clone GNU/Linux, MS windows, Intel-based Mac OS, and FreeBSD, NetBSD, and OpenBSD, no matter it's 32-bit (x86) or 64-bit (x86-64) OS. For these file systems, only used blocks in partition are saved and restored. For unsupported file system, sector-to-sector copy is done by dd in Clonezilla.
LVM2 (LVM version 1 is not) under GNU/Linux is supported.
Grub (version 1 and version 2) is supported.
Unattended mode is supported. Almost all steps can be done via commands and options. You can also use a lot of boot parameters to customize your own imaging and cloning.
Multicast is supported in Clonezilla SE, which is suitable for massively clone. You can also remotely use it to save or restore a bunch of computers if PXE and Wake-on-LAN are supported in your clients.
Based on Partclone (default), Partimage (optional), ntfsclone (optional), or dd to image or clone a partition. However, Clonezilla, containing some other programs, can save and restore not only partitions, but also a whole disk.
By using another free software drbl-winroll, which is also developed by us, the hostname, group, and SID of cloned MS windows machine can be automatically changed.
Limitations:
The destination partition must be equal or larger than the source one.
Differential/incremental backup is not implemented yet.
Online imaging/cloning is not implemented yet. The partition to be imaged or cloned has to be unmounted.
Software RAID/fake RAID is not supported by default. It's can be done manually only.
Due to the image format limitation, the image can not be explored or mounted. You can _NOT_ recovery single file from the image. However, you still have workaround to make it, read this.
Recovery Clonezilla live with multiple CDs or DVDs is not implemented yet. Now all the files have to be in one CD or DVD if you choose to create the recovery iso file.
License:
Clonezilla itself is licensed under the GNU General Public License (GPL) Version 2. However, to run Clonezilla, a lot of free and open source software, e.g. the Linux kernel, a mininal GNU/Linux OS, are required.
Which Clonezilla Shall I Use ?
Clonezilla Live: Clonezilla live allows you to use CD/DVD or USB flash drive to boot and run clonezilla (Unicast only)
Clonezilla SE: Clonezilla SE is included in DRBL, therefore a DRBL server must first be set up in order to use Clonezilla to do massively clone (unicast, broadcast and multicast are supported)
1- Log on to your Windows system. Just ignore the error message for the time being.
2- Go to Windows Start button -> All Programs -> Accessories
3- Right click on Windows Command Prompt and choose Run as administrator. Wait for the Command Prompt to launch.
4- Using the command prompt, navigate to the C:\Windows\System32\ folder.
5- Type “netsh” and press Enter. The prompt will change to netsh>
6- Type “Winsock reset“. Press Enter once more.
Bahagian Satu Keperluan Asas Yang Perlu Ada / Hardware
–> USB External Video Capture
–> Dekoder Astro
–> Laptop / Desktop
–> Kabel Audio / Video ( Merah / Putih / Kuning )
–> Kabel S-Video ( Optional )
–> Hardisk Sekurang Kurangnya 20Gb ( Untuk Simpanan Sementara ) Keperluan Yang PERLU Ada Software
–> Cyberlink Power Director Version 5 And Above ( Proses Rakaman )
Bahagian Dua ( Proses Rakaman )
–> Install Driver USB External Video Capture ( Dari CD Yang Dibekalkan )
–> Bukak Cyberlink Power Director
–> Klik Capture ( Ikut Setting Kat Bawah )
–> Klik Profile –> Profile Setup –> Mpeg-2 Video
–> Edit –> Video Resolution –> 720×576 [DVD Pal] –> Yang lelain Tu Biar Default saja.
–> Audio –> Audio Compression –> Dolby Digital –> Audio Compression Rate –> 256 Kbps –> OK
–> Analog Video Setting
–> Capture Device –> Syntek ST1160 ( USB External Video Capture )
–> Capture Source –> S-Video / Video Composite ( Pilih Mana Yang sesuai )
–> Audio Devise –> USB Audio Interface
–> Audio Input –> Digital Audio Interface
–> Adjust Video –> Biar Default Saja.
–> TV Setup –> Television Signal Format –> Format (Non-Tuner) –> Pal_B –> OK
–> Bila dah Siap Setting –> Klik Butang Record Untuk Mula proses Rakaman Dan Stop Untuk Berhentikan Rakaman.
–> Tips !
* Kontrol Volume Hanya Dari Remote Astro
* Masa Proses Record Dijalankan Memang TIADA Audio Yang Kedengaran Dari Speaker Laptop / PC
BAHAGIAN Tiga ( Proses Suntingan )
Yang Nie Pon Penting Jugak Untuk Memotong Bahagian Iklan Dalam Movie Tersebut. Proses Ini Tidak MENGAMBIL Masa Yang Lama. Lebih Kurang 10 – 20 Minit sahaja.
Memula Buka Software MPEG Video Wizard
–> Klik Open File –> Add File MPEG Yang Di Capture Dari TV
–> Button Yang Digunakan Semasa Proses Edit
–> Forward
–> Reverse
–> Button N/M/F [ Untuk Control Kelajuan Gambar ]
–> Mark In [ Set Tanda Permulaan Bahagian Yang Hendak Dipotong ]
–> Mark Out [ Set Tanda Pengakhiran Bahagian Yang Hendak Dipotong ]
–> Button Cut [ Untuk Membuang Bahagian Yang Tidak Dikehendaki ]
–> Bila dah selesai Proses Memotong Bahagian Iklan –> Klik Kat Dalam Video Screen Drag Ke Video Section Kat Bawah.
-> Klik export ( Butang Merah Bulat Penjuru Bawah Kanan ) –> Save As –> Automatic (mpg)
–> Siap [ Proses Nie Ambik Masa Dalam 10-15 Minit Sahaja ]
Bahagian Empat ( Convert Ke Format Avi ) Guna Auto GK Program
Tutorial Nak guna Auto Gk Untuk Convert ke Format Avi [1.4gb / 700mb / 350mb / 175mb ] Size 1.4gb – Untuk Durasi Filem melebihi 2 Jam [ Kekalkan Kualiti ]
Size 700mb – Size yang biasa dan popular untuk movie format avi
size 350mb – Untuk TV series [ 40 ke 60 Minit ]
Size 175mb – Untuk TV series 30 Mint Ke Bawah
–> Buka Software Auto GK
Step 1 [ Input And Output File ]
–> Input File [ Masukkan File Mpeg Yang hendak Di Convert Menjadi Avi ]
–> Output File [ Set Nama File Avi Tersebut Dan Location File Itu Akan Disimpan ]
Step 2 [ Audio Tracks & Subtitle Tracks ]
–> Memang Ada Satu Saja. Jadi biarkan Default
Step 3 [ Select Output Size ]
Tick Predefined Size
–> Boleh Pilih Kat Drop Down Menu Size mana Yang Sesuai. [1.4gb / 700mb / 350mb / 175mb ]
–> Yang Lelain Tu kalau ada masa boleh La Cuba Nanti [ Custom Size / Target quality ]
Step 4 [ Advanced Parameters ]
–> Klik Advanced Setting ( Sekali Sahaja Buat Setting Nie. Lain kali takyah Setting Dah )
–> Output Resolution Setting –> Auto Width
–> Output Audio Type –> VBR MP3,128 kbps
–> Codec –> XviD
–> Yang lelain Yu Biar Default saja –> OK
Bila Dah siap Semua Setting Tu / Dah Puas Hati –> Klik Add Job –> Klik START
Tunggu Saja Hasilnya. Biasanya Proses Ini Akan Ambil Masa 30 Minit Ke 3 Jam { Bergantung Kepada Size Movie Berkenaan Dan Juga Keupayaan PC Anda }
Bila Dah Siap –> delete Semua File Yang Tidak Berkenaan KECUALI File Avi Sahaja. Setel Dan Boleh Lihat Sendiri Hasilnya..
-::Note::- Proses Rakaman – 2 Jam
Proses Edit Video Mpeg Untuk potong Iklan – 15 Minit
Proses Convert Dari Mpeg Ke Avi – 2 Jam 30 Minit
Proses Split Avi Ke Winrar – 20 Minit
Proses Upload File Winrar Ke Rapidshare – 5 – 7 Jam ( 8 x 100MB )
Keseluruhan Proses Untuk Satu Movie Yang Di Capture Dari TV Untuk Sampai Ke Internet Amik Masa Lebih kurang 12 Jam…
Acer Aspire 4738G-464G50 New ! Genuine Windows® 7 Home Premium 64-bit Intel® Core™ i5-460M processor (3 MB L3 cache, 2.53GHz with Turbo
Boost up to 2.8GHz, DDR3 1066 MHz, 35 W), supporting Intel® 64
architecture, Intel® Smart Cache Mobile Intel® HM55 Express Chipset
ATI Mobility Radeon™ HD 6470 with 512 MB of dedicated DDR3 VRAM,
supporting Unified Video Decoder (UVD), OpenEXR High
Dynamic Range (HDR) technology, Shader Model 5.0, Microsoft®
DirectX® 11, OpenGL® 3.1, OpenCL™ 1.1
14" HD 1366 x 768 pixel resolution, high-brightness (200-nit) Acer
CineCrystal™ TFT LCD 16:9 aspect ratio
500GB SATA HDD
4GB DDR3 RAM
Integrated Fast Ethernet, Wake-on-LAN ready
Integrated Bluetooth® 3.0+EDR
Acer InviLink™ Nplify™ 802.11b/g/n Wi-Fi CERTIFIED™
supporting Acer SignalUp™ wireless technology
Integrated 8X DVD Super Multi Plus Drive
Acer Crystal Eye webcam, 1280 x 1024 resolution
Built-in mono speaker with high-definition audio support
48.8 W 4400 mAh 6-cell Li-ion standard battery pack
Estimated battery life: up to 4.0 hours
(Actual battery life may vary, depends on usage and configuration).
2-in-1 card reader (SD™, MMC)
Three USB 2.0 ports
HDMI™ port with HDCP support
External display (VGA) port
Headphone/speaker/line-out jack
Microphone-in jack
Ethernet (RJ-45) port
DC-in jack for AC adapter
342 (W) x 249 (D) x 28.5/33.5 (H) mm
2.2 kg (4.85 lbs.)
1. Type in capitals Q33 NY. This is the flight number of the first plane to hit one of the Twin Towers. 2. Highlight the Q33 NY. 3. Change the font size to 48. 4. Change the actual font to the WINGDINGS 5. Check what happen.
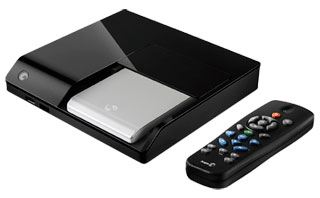
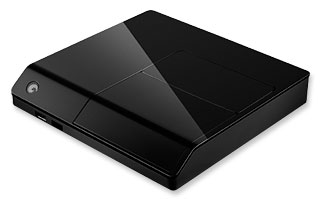
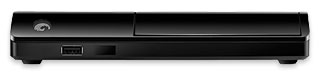
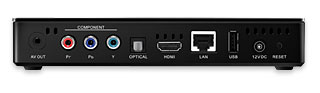
Seagate FreeAgent Home Theatre + (Theatre Plus) HD Media Player (STCEA201-RK)
Music, Movies, Photos | HDMI | Networking
Model: STCEA201-RK
Overview
Play your movies, music and photos from your Thumb drive or external hard disk on your TV in full HD.
* Makes it easy to move your music, movies and photos to your home theater * Lets you experience incredible HD quality playback with riveting surround sound * Simplifies viewing and managing all of your digital media files * Setup in minutes with a single HDMI connection
Perfect for when you need to:
• Enjoy and share your photos, movies and music on your TV in the comfort of your living room. • Access content from storage devices on your network. • Access internet content, on your TV, such as pictures, weather, stocks, and more. • Directly connect a digital camera or external storage device to enjoy media on your TV.
Product Images
*HDD sold separately*
Package Contents
Media Player
Cables
Set-Up Guide
Remote Control
1-Year Limited Warranty
Additional Information
Features
Access the Internet services you use every day: # YouTube # Mediafly # vTuner # Picasa # Flickr # Video Feeds (RSS) # Text Fees (RSS) # Finance Widget # Weather Widget
• Easily enjoy your photos, movies and music on your TV. • HDMI connectivity and 1080p HD video playback. • Dolby® Digital and DTS® audio support • Ethernet connection for accessing shared content on your network. • Unique docking system eliminates fumbling with cables and connections. • Front-mounted USB port for digital cameras and additional storage devices. • Includes sync software for PC and Mac® computers. • Intuitive user interface with DVD-style navigation. • Windows® XP, Vista®, Windows® 7, and Mac OS® X compatible.
Add a new dimension to your home theater
You’ve got countless movies, music and photos on your computer, and an incredible home theater system in your living room. What if you could bring them both together and enjoy all of your digital entertainment without ever leaving your couch? Now you can do all that and more, with the Seagate FreeAgent Theater+ HD Media Player.
* Lets you watch, share and store your music, movies and photos from your TV * Delivers stunning 1080p HD image quality with rich Dolby Digital® and DTS® audio (if supported in your digital media files) * Sets up in seconds via a single digital HDMI® cable * Includes an optional 500GB FreeAgent Go hard drive for easy docking, or use you own FreeAgent Go, BlackArmor® PS 110 or other external hard drive
Disabling the Search Indexing Feature in Windows 7
Right Click the “Computer” Icon in the desktop and select “Manage”.
Click “Services and Applications” in the “Computer Management” window.
Click on “Services”.
You can see a lot of services listed there. Look for “Windows Search” in that.
Right Click on “Windows Search” from the list and choose “Properties”.
The “Windows Search Properties Window” will open up. From “Startup type” click on the drop down menu and choose “Disabled”.
Click “Apply” then “OK” and that’s it. The Windows 7 Search Indexing Feature is now disabled.
Most of the Windows 7 users do less searches in there system. The Search Indexing service in Windows 7 will index keeps track of the files so that they can be found quickly when asked at some other time. This feature is useful only if you perform frequent searches on your system. For occasional file searchers the Search Indexing service in Windows 7 is a total resource hog. It unknowingly eats up your system resources. What you need from windows 7 is maximum performance from it then i would certainly recommend you to disable this resource hogging Windows 7 Search Indexing Feature.
To Disable the Search Indexing Feature in Windows 7
If you want to completely disable the search indexing feature in Windows 7 you can set the Search Indexing Service to Manual (See the above method about disabling unwanted services).
Disable the Aero Theme on Windows 7
Right Click on your Desktop and select ” Personalize ” click the Window Color Tab.
Uncheck the Box saying ” Enable Transparency ” and then click on ” Open classic appearance properties for more color options”.
Then a window will open up. Apply a Standard or Basic theme from it. The Standard Windows 7 theme is more preferred.
The aero user interface certainly adds some ” Eyecandy ” to Windows 7 but certainly is a resource hog especially when, what you expect from windows 7 is more performance juice. Aero user interface squeezes your graphics or video card to its maximum. So why dont we just avoid the Windows 7 aero? if we care more about speed and performance in Windows 7. So Disabling the Aero in Windows 7 certainly adds an extra speed boost to it.
Disabling the aero theme alone in Windows 7 will really speed things up. You can know this by looking into the memory consumption when aero is turned on and off.
Disabling the Unwanted Visual Effects in Windows 7 to Speed Up more
For this right click on ” Computer” and select “Properties” from the right click menu.
Click on ” Advanced System Settings ” from the left pane to open up the ” System Properties ” window.
Select the “Advanced” tab from it. Then Under ” Performance ” click ” Settings “. Choose ” Custom: ” Options From it.
Now un tick all the options and select only the last four options (actually three only needed; you can un tick the second option from the last four). See the screen shot if you have any doubt.
Now just logoff your system and turn logon.
Even though we have tuned off the aero effects in Windows 7 still there are many unwanted visual effects that can be safely disabled to speed up windows 7 even more.
You will now notice the speed difference now.
Disabling the Unwanted Services to Speed up Windows 7
There are many services in windows 7 that we dont require for our daily use. There are some exceptional cases though. Services such as “print spooler” is only needed when we use a printer. If we use a printer only occasionally we can safely turn off that service in Windows 7 and turn it on only when we need to take a print.
Disabling the unneeded services in Windows 7 can really speed up the system boot time.
Disable the User account control (UAC) Feature in Windows 7
From the Control Panel open the ” User Accounts and Family Safety ” > User Account.
Click the User Account Control settings link.
Now just Drag the Slider towards “Never Notify”.
Click “OK” and Reboot your system.
The User account control (UAC) feature in Windows 7 is very annoying though it says it can protect your computer from harmful virus activity etc. But if you are a daily user of your computer this windows 7 feature will be a total nuisance to you.
To Disable and Turnoff UAC in Windows 7
Disabling UAC is for advanced users only its not recommend doing it if not.
SetUp the Windows 7 Ready Boost Service for an Extra Speed Boost
To configure the Ready Boost Feature in Windows 7 you need to have a High Speed Flash/USB or Pendrive with you which is ready boost compatible.
After plugging you pendrive, open “Computer” > Right-click the on USB Drive/Pendrive > select “Ready Boost” tab > tick the “Use this device” checkbox.
You can configure how much space on your USB drive/ Pendrive to be used as Ram.
The ready boost feature in Windows 7 will help you to use your flash drive or pendrive or USB drive as Ram there by improving the performance and speed of windows 7 greatly. You can certainly experience it when launching bulky applications such as Adobe Photoshop etc.
Turn off Unused Windows 7 Features
Open up ” Programs and Features ” from Control Panel.
Click the ” Turn Windows features on or off ” from the left pane.
Now uncheck all the Feature that you don’t use in Windows 7 and restart the system for the changes to take effect.
There are many feature in windows 7 that we often don]t use. Disabling these unused features in Windows 7 will really help in speeding things up.
Disable the Windows 7 Sidebar (Actually the Gadgets)
Right click on the sidebar and select ” Properties “.
On the properties windows untick the check box showing ” Start sidebar when Windows Starts “
From now on windows sidebar won’t start when windows 7 start up.
Disabling the window 7 sidebar is definitely help you to to gain a few seconds during start up time. There are many useful utilities such as the RocketDock etc. which are good application launchers.
To Disable the Sidebar in Windows 7,
Disable the Aero Peek and Aero Snap features in Windows 7
Open the Windows 7 ” Control Panel ” and double-click on ” Ease of Access Center ” icon.
Now click on the ” Make it easier to focus on tasks ” seen at the bottom in there
Now untick the check box saying ” Prevent windows from being automatically arranged when moved to the edge of the screen ” .
Right click on the Windows 7 taskbar and select ” Properties “.
Now untick the ” Use Aero Peek to preview the desktop ” option from there.
Aero Snap will help you to maximize, minimize and resize the windows just by dragging and dropping it into the screen corners.
To disable Aero Snap Feature in Windows 7,
That will now disable the Aero Snap in Windows 7.
Now To Disable the Aero Peek feature in Windows 7
The Aero Peek feature in Windows 7 helps you to peek through all open windows by hiding all other windows and showing only the outlines of all windows. Aero Peek is similar to the ” Show Desktop ” Feature in XP and Vista.
If you have followed step 3 then Aero Peek will be automatically disabled. If not,
The aero peek feature will now be disabled in windows 7.
Change the Power Plan To Maximum Performance
Double click the ” Power Options ” in the Control panel.
Click the down arrow showing ” Show Additional Plans ” to see the ” High Performance ” power plan
.
Now just activate the ” High Performance ” plan and that’s it.
You may go for the advanced settings for further tweaking if you want.
The Power settings in Windows 7 is not automatically set for maximum performance. By default the power plan in Windows 7 is set for a balanced performance with energy consumption on hardware. So you may not get the optimal performance from windows 7 if this is the case. So we need to change the power plan to High Performance Mode.
Disable the Thumbnail Preview Feature to speed up File browsing in Windows 7
Double Click on ” Computer ” >click on the “Organize” drop-down menu and select the “Folder and Search options”
Under ‘Files and Folders’ section, go to the “View” tab and tick the check box showing “Always show icons, never thumbnails” checkbox.
The thumbnail preview feature in Windows 7 will show the small thumbnails of the contents of a folder instead of showing it’s icon. But this feature really do take up some system resources. So by disabling the Thumbnail Preview feature in Windows 7 the file browsing in Windows 7 explorer can be speed up.
In order to maintain your Windows 7 Performance and keep it up in Top Shape there are some very essential software’s that can help us to Speed Windows 7. I will list some of them here. You can download these utilities. But i remind you that you need to run these utilities at least once in a week. Only if you do it regularly your Windows 7 will be in top shape every day.
Here are some registry teaks that can be used to speed up windows 7 even more. I have complied only the safest tweaks that can be applied to your PC. Apart from speeding up windows 7 they will also add some functionality in windows like adding Copy to / Move to in right click context menu to speed up your daily tasks.
If you have the complete version of Tune Up Utilities software with you then it is the best one to keep your Windows 7 in top shape.
Turn OFF Windows 7 Password Protection To save a few More Seconds!!!
If you have set a password for accessing your user account in windows 7, then you need to enter it each and every time you logon to windows. Logging into windows automatically without entering any password will save you a few seconds more. If you are the only person who use your computer then i would recommend to turn this off. If that is not the case you can skip this step.
Click the Screen Saver link ” From the Screen Saver drop down menu, Set it to “None” and click “Apply” and then “OK”.
Now click on “Desktop Background” link.
From the “Location” drop down menu select “Solid Colors” and pick one color and click “OK”.
In order to display the wallpaper and screen saver the system needs some memory. So by disabling those two we can save a few Mega Bytes of memory.
To Disable The Screen Saver and Wallpaper in Windows 7,
Disable Unwanted Start Up Items and Speed Up Windows 7 Start Up
Type ” msconfig ” in the “RUN” option from start menu press [Enter] to open up the System Configuration Utility.
Now navigate to the “StartUp” tab.
Untick the Entries which are not needed
This really matters when you have installed a lot of softwares on your PC. Many software such as AcdSee will run services such as device detector etc during the system start up. These are of no use actually for most windows users. So preventing such services from starting up during the start up of windows 7 can result in quicker start Ups. This will actually save some seconds during windows 7 start up.
Disable Unwanted System Sounds in Windows 7
Type mmsys.cpl in RUN From the Windows 7 Startmenu search box and press [Enter].
Navigate to the “Sounds” tab.
Now from under “Sound Scheme:” select “No Sounds” > Click “Apply” > “OK”.
You can keep some of your favorite sounds turned on if you want, but sounds played during the Windows 7 start up, shutdown, Logon, logoff, start navigation etc should be set to none if you want some real speed boost.
In order to play the sounds you hear in windows 7, system resources are being utilized. So if you can disable these sound effects you can gain some speed and also free some system resources too.


")


